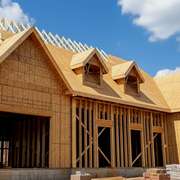


There are many ways to build a slab-on-grade (or frost-protected shallow foundation), the following is a step-by-step walk though of a thickened-edge slab floor we built. XPS or EPS rigid foam is typically used under concrete slab floors, in this case we used mineral fiber insulation.
Note: our mineral wool was provided by Rockwool (formerly Roxul) and their engineers at could not confirm with us that their product had the compressive strength to carry the load under the footing, so where the weight of the walls would bear, we installed EPS foam instead.
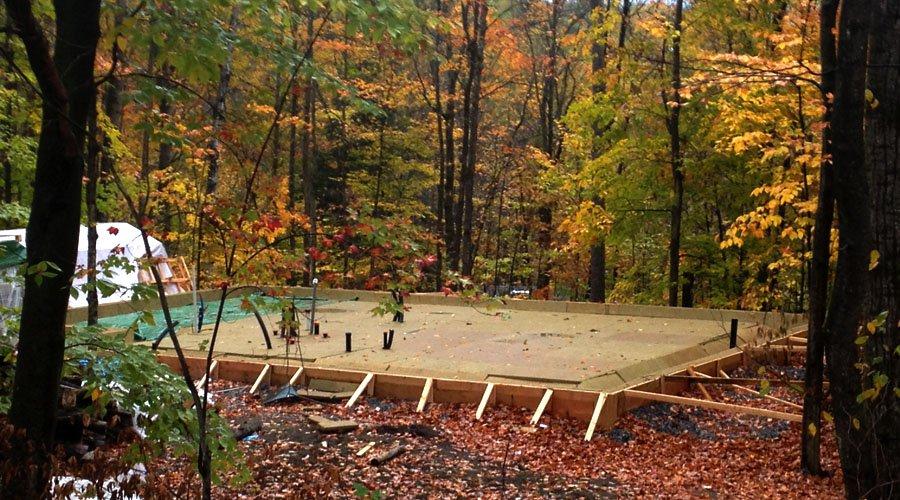
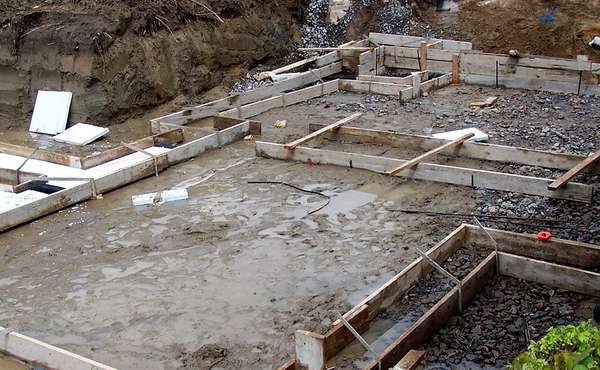
Slab floors are often built in a way that requires footings and sometimes frost walls to be poured first, with the interior slab floor being poured later once the footing has set. Insulation underneath the footing is often omitted with this technique, which leads to thermal bridging and heat loss. building a slab with a thickened edge footing also requires a second trip with a concrete pump truck, which depending on your region can run anywhere from $700 to $1000. Instead, what we have done here is known as a 'monopour', where the footing and slab are poured at the same time.
Here are the basic steps for slab-on-grade construction on soil that does not have a high water table and has sufficient compressive strength to carry the load of the building. For problem soils see our pages on raft slabs and how to build on problem soils.
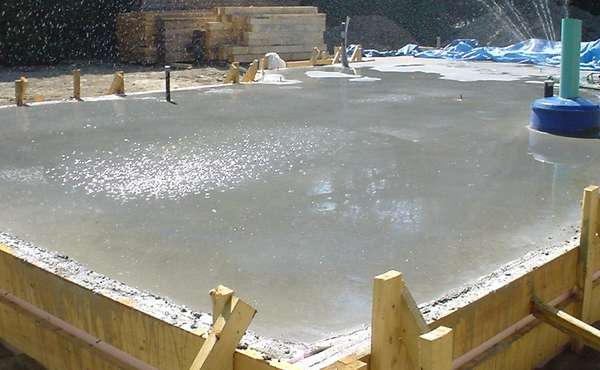
Creating a level surface for a slab on grade
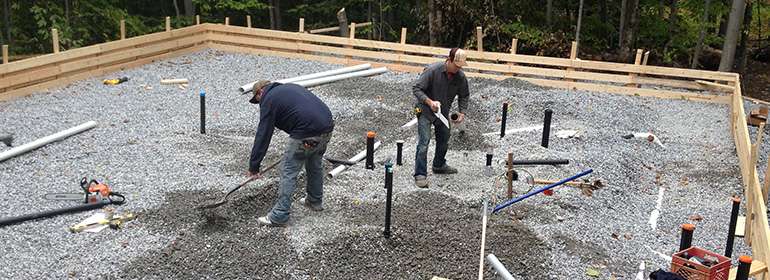
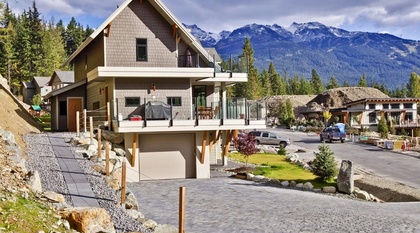
After the land was cleared, compactable fill was brought in to bring the site to a workable level. The house sits at about grade at the north side, but needed about 3 feet of fill at the south edge to level the building site.
A plate packer was used to tamp the ground in stages to ensure a solid base, as seen above. A retaining wall was built using rocks from the site to hold the compacted gravel and future slab in place.
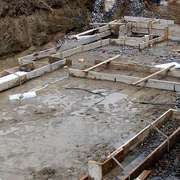
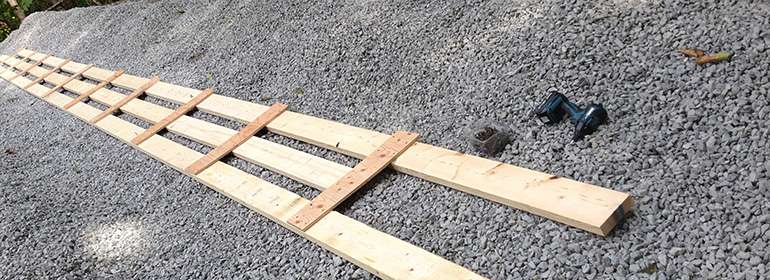
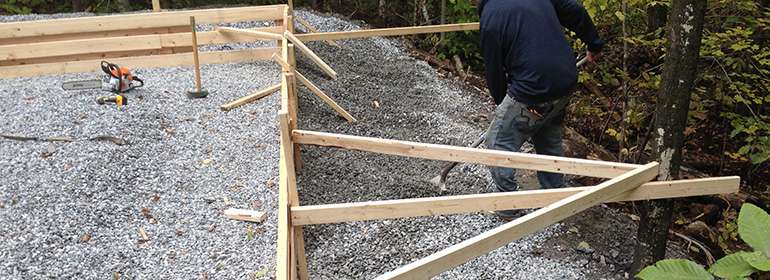
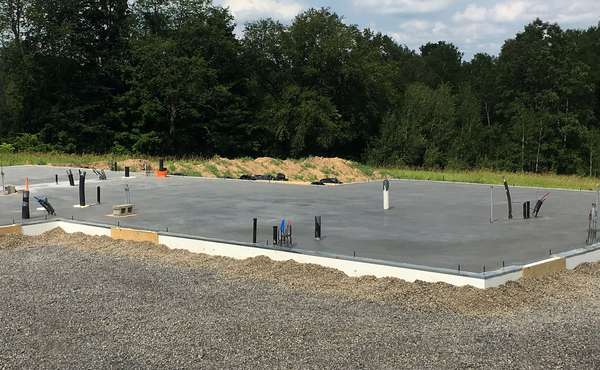
Building slab footing forms
A common technique for build forms is to drive stakes into the ground then attach boards to them to act as concrete forms, but we decided to pre-build forms then raise and square them the way you would with walls. This was intended to make disassembly easier and allow us to reuse the wood. Hard to say if it ended up being easier or not in the end, but it went fine.
Forms need to be well-secured to avoid a blow out, including lots of braces to hold the weight of the concrete so forms don't bend. Three runs of 2x6's easily held concrete and insulation, and after forms were removed, that wood was used for framing.
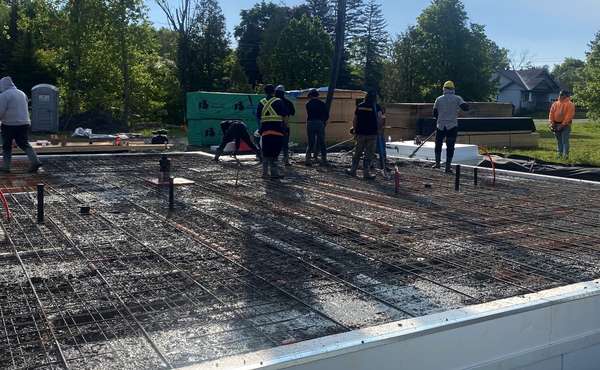
Plumbing and mechanical infrastructure
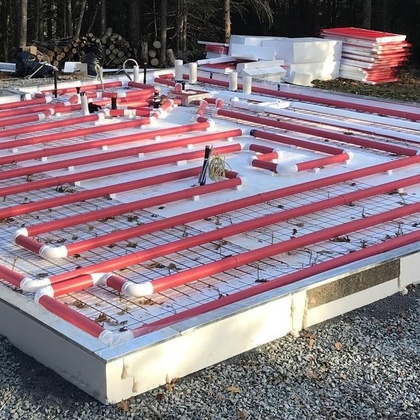
All plumbing infrastructure (water pipes, drains, radon stack, central vac, power conduits, etc.) was put in place next, below the coming insulation and concrete.
You need to be very sure about the placement of plumbing at this point as concrete is not so forgiving when it comes to making changes afterwards. You will need to pour concrete right up to drains in the floor, but for sink and bathtub drains that you will not see, you can make your life a lot easier if you don't encase them in the concrete. Either build a wooden form around the drain pipes or even just cut a hole in a bucket and stick it over top. This way the drain will have a little play, making it much easier to hook up bathtub and sink drains.
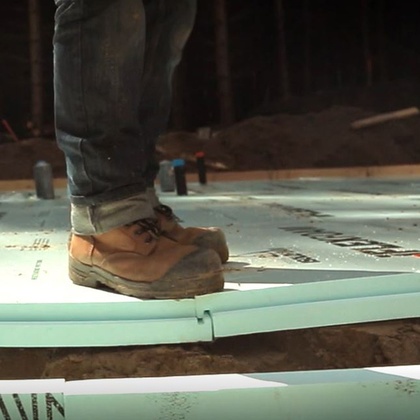
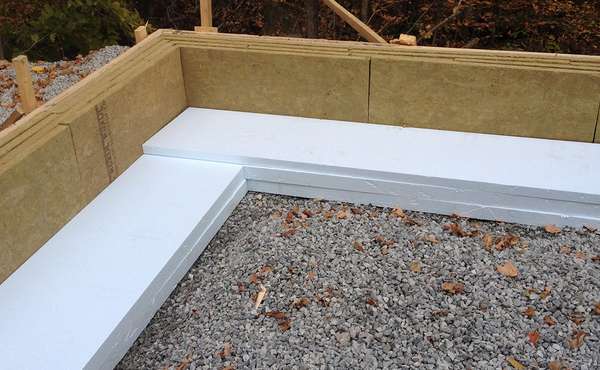
4. Installing sub slab insulation
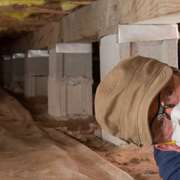
After all the plumbing was in place, 8 inches of rigid insulation was installed - Rockwool underneath the slab and on the vertical exterior surface, and 8 inches of EPS under the footings.
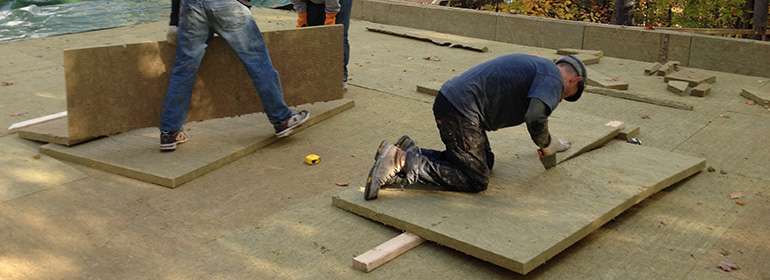
Comfortboard is great to work with, it cuts very easily and stays securely in place without slipping, allowing for tight clean joints. This is a nice added benefit when you are doing multi-layers as we did here. The joints of each layer were offset as well to further reduce heat loss.
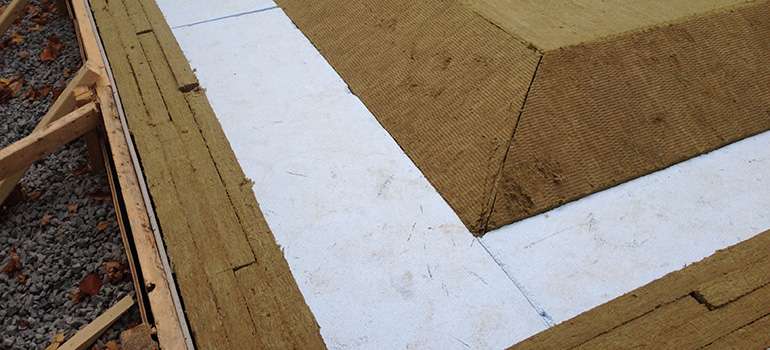
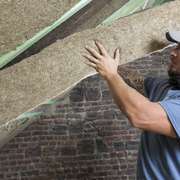
We placed 8 inches of rigid mineral wool vertically to protect the exterior of the slab, and we included a cement board outside the insulation boardsbut inside the form. We later attached the cement board with plastic tie straps that passed through the insulation and vapor barrier into where the future footing will be; a 1.5" screw was put into the end of the tie strap to act as an anchor inside the concrete after it sets.
The reasoning behind this step was to have a well-insulated slab with no thermal bridging, and a cement exterior ready for parging when the forms were removed. After disassembling the forms we were happy to see it worked exactly as planned. See a short video of how we did this.
Plastic ties were chosen over long nails or screws to prevent the heat loss that would come through metal, which our engineer assured us would be significant, far more than we would have expected before seeing software energy simulations. Metal fasteners would have effectively reduced the total R value by almost half, testament to the conductive powers of metal and why as a material it should be very selectively used in wall assemblies.
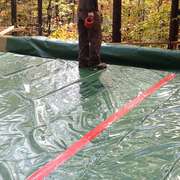
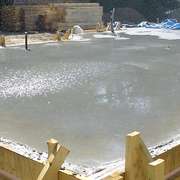
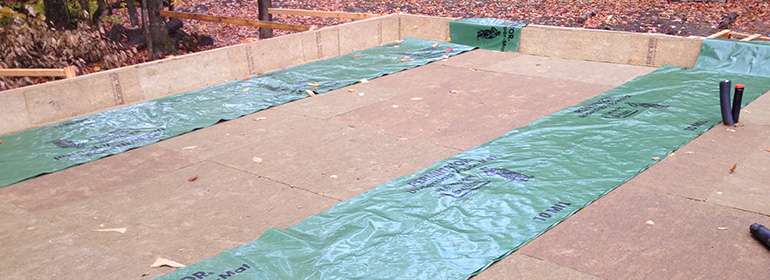
6. Radon gas barrier / vapor barrier under slabs
For added durability over the commonly used 6-mil polyethylene vapour barrier, we used a 10-mil barrier instead. The added thickness gives us more protection against accidental holes made during the construction phase, giving us greater confidence in it for radon gas protection.
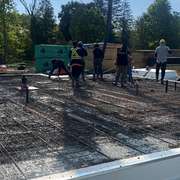
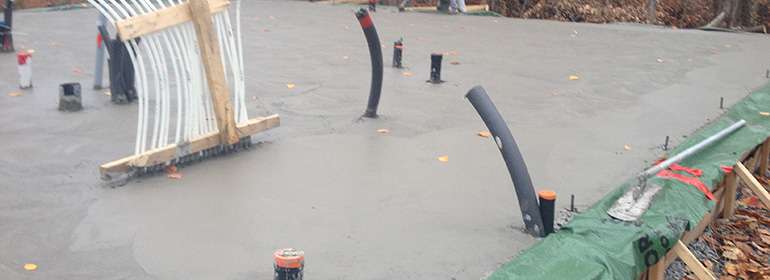
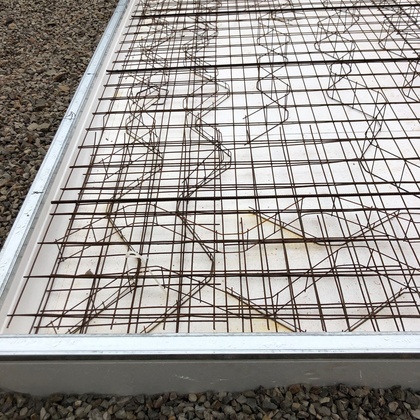
To support the concrete mesh as it extends over the footing, we cut sections of mesh that sit on small foam feet. This also supports 4 rebars that will be imbedded in the concrete footing at exactly the position we want them.
Despite that it may look somewhat labour intensive, this little detail took only a few hours to do and it ensured that our mesh was level, our rebars were well-positioned and our vapour mat was not punctured.
Radiant floor hydronic tubing
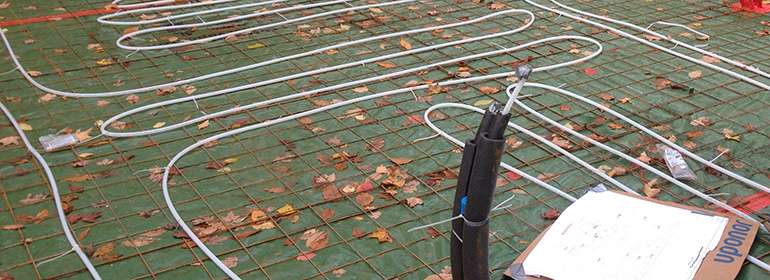
Limiting the length of tube installed per zone is very important at this stage; with too long a run the water will have cooled too much towards the end of its return trip to effectively supply heat. We had our zone system designed by our sponsor Uponor which ensured that the heat would be balanced as best as possible.
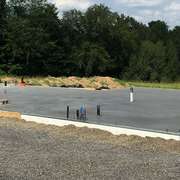
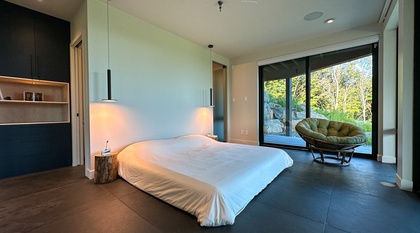
9: The final floor will be a polished concrete, which is completely non-toxic and very durable. The production of concrete is a heavy polluter, releasing one ton of GHGs (greenhouse gases) per ton of concrete. So we chose a concrete mix that included 50% recycled material, which significantly lowers the total emissions of our build, and brings in some LEED points as well.
There is an often overlooked advantage when you choose a slab over a basement - concrete is very expensive, so the reduced amount of concrete used in a slab along with not needing to install a subfloor and finished flooring product translates into a savings of many thousands of dollars.
Now you know more about how to build a slab on grade on a footing. Find more pages about sustainable and resilient green building techniques in the Ecohome Green Building Guide pages, and here :
Learn about the discounts and perks of signing up for a free Ecohome Network Membership here. |


My mother has wanted me to build her a log cabin for many years. She wants a storm cellar-tornado protection.
What is the storm-tornado plan for slab on grade?
Where this house is built tornadoes are virtually unheard of. Every decade or so we get one that knocks over a few trees within perhaps a hundred km radius, but that's about it. That said, You could easily incorporate one into your home if you were at all concerned. It wouldn't take much to build some sort of concrete reinforced safe room within the mechanical room for example, which until needed could serve other purposes. Great question, thanks for that. If anyone has ideas or has built some sort of tornado protection into an above grade home we'd love to hear about it. Are you building in a high risk area? We would be happy to bounce ideas with you about it. Best regards.
Hi, Mike this is really cool stuff you are doing, with the cost of heating these days, I feel that small and efficient is the way to go. Couple of questions, mostly so I don't sound like an idiot when I'm talking about these things, when discussing slab on grade vs. traditional excavated foundations.... Aren't basements considered to be somewhat of a "heat sink" if they are adequately insulated, and if left to be unfinished, very cheap useable space? We live in a 990 sq. ft home, and with three of us, without the basement I think the home would be too small. Also I noticed you mentioned using the concrete forms later in the framing process....again to stop me from sounding un-informed in the future discussions, I thought this was against code, as the cement dust is caustic and over time would damage wood. Looking very much forward to seeing more as the project continues.
Hi Mike,
Interesting project, looking forward to the rest. I asked in the first blog when the project was announced, but didn't get a reply.
Can you comment on the use of Roxul as sub slab insulation? Specifically, are there no concerns about ComfortBoard CIS's compressive strength? The sell sheet for Roxul puts it around 8.5 PSI at 10% deformation. Seems low? I realize you have foam (presumably higher density) where the slab will bear weight.
Great detail/trick with the cement board and tie straps. Do you have some pictures of the outside face of the slab (the cement board) after you stripped forms? Looking forward to the video.
Best regards, Jason
Hi Ecohome Folks,
Looks like a interesting project! I have a nose around the site and can't find any plans or more info on this demo house. Are they on the site anywhere? be interesting to see.
Thanks
Keith
Roxul lists the compressive strength of ComfortBoard IS as 743 pounds per square foot (psf) at 10% compression and 1,269 psf at 25% compression. Structural engineers EBN spoke with confirm that this is perfectly adequate. “Roxul and every other rigid insulation I know of is more than strong enough to support a ground slab,” according to Bruce King, P.E. King explains that the weight of slabs varies from 50 psf for a 4"-thick slab to 150 psf for a 12"-thick slab, while code-imposed live loads vary from 40 psf (residential) to 50 psf (office) to 300 psf (heavy storage). “At the extreme, a fully loaded 12" storage slab is still far less weight than would appreciably compress the insulation,” King told EBN.
Source: http://www2.buildinggreen.com/article/move-over-foam-sub-slab-mineral-wool-here
Andre, thank you for the response, information and links.
Best regards, Jason.
Sorry for the late reply Jason, Looks like Andre filled you in with the necessary stats, thanks Andre! As you saw, our only concern was the footing, so in the absence of test results from Roxul engineers we would again stick to the EPS to be sure. I spoke with other engineers who thought it should be fine, but it's never a good idea to be the first penguin to jump off the iceberg.
We were really happy with how the form ties held on the cement board, we will for sure have details coming on that as well. Thanks for your interest Jason!
Regards, Mike
Hi Mike
You would want any conditioned part of your home to be well insulated. Any heated space with poor insulation will drain energy from your home. Basements can be useful space, especially in urban centers and specifically where they already exist.
But for starting from scratch, slabs can be more affordable along with removing the unnecessary risk of water and moisture damage that is inherent with building underground. So when a basement makes sense, go for it. Just be sure to do it right.
What we want to get out there is the fact that they aren't 'necessary' for a safe and durable home, in fact they more often make homes less safe and durable. We build them to get below the frost line, meaning we are using dirt as insulation. With a slab you are simply using insulation as insulation instead.
We do have a page on best practices for basement construction, new and retrofits, have a look:
As for the wood from forms, remember they were a long way from having any contact with cement. They were separated by cement board, 8 inches of insulation and a plastic barrier. And as it turns out, to protect the cement board and insulation during framing, we ended up leaving them in place during exterior wall framing so they will likely find their way into other interior projects instead. Cheers, Mike
Hey Keith,
it's on our to-do list, you're not the first to ask. We will have them up on the site soon I hope, check back soon. Thanks.
Thanks for the terrific article. Any thought given to water quality with pex piping and potential alternatives?
e.g. http://www.angieslist.com/articles/does-pex-piping-affect-drinking-water-quality.htm
Hi Mike !
We're planning a slab on grade for our new build this spring. We're planning to have the wall framing done with insulated forms from "Polycrete" which sounds pretty efficient from what i found out at their site this week. Now, my concern is, is there a chance water could leak in from the transition between the wall and the slab as it is so close to grade and the amount of snow we get in Quebec, and if there is, what's the best way to keep it from happening ? Thanks for all the great information and details on your site !
if you place a 2 by 4 flat in the form when pouring the slab (the top of the 2by4 to be flush with the top of the slab), that will give you an 1.5" step which can be cut from the inside of your first layer of forms. that solves any water penetration problem
My concern, about the foam, is the rats have been known to dig trenches from up to several feet? What if gravel washes away over time, can rats get under the foam and cart it off leaving a space that could cause a crack? Is the foam mainly for insulation cause I would think putting it between the cement and floor would be a better solution but I am only a housewife....with no experience...just surfing for cottage ideas.
I guess it all depends on where you build, and if you are in a rat infested area, we've never seen any such case where the insulation was damaged by rats. But if that were to happen, they would then hit the concrete, so it's really not at a greater risk than any typical foundation footing.
As for gravel, yes, you need to make sure it doesn't wash away, but that's not a difficult task. You lay soil and ground cover over top and it doesn't go anywhere.
I know you used plastic ties to keep the multiple layers of vertical insulation together, but did you do anything to keep the boards inside the forms from separating or are they just floating around in there?
Hi Greg,
The insulation boards are compressed between the concrete and exterior cement board, so there is no way for them to move around.