


Frost in attics: why is there ice in my roof?
When a warm sunny day arrives after a long cold stretch and it seems like you have a roof leak when there isn't a cloud in the sky, it's probably Attic Icing, otherwise known as Ice Dams or Ice Damming, and the surprising thing is that it's very unlikely that the roof covering itself is the problem.
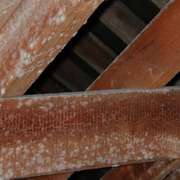
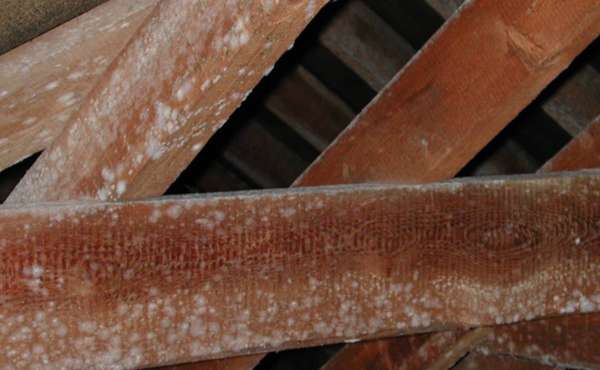
Frost and ice forms in attics when warm, humid air accumulates and condenses on the underside of your roof sheathing. Depending on the temperature, and the insolation (ie. can sun get to the roof) you will have either frost or water collecting. A little bit of frost forming is not unusual after really low nighttime temperatures, and it isn't a huge problem if it is able to melt and evaporate so that the wood can dry.
However, it becomes a more serious problem when the quantity of frost isn't able to evaporate before more starts to accumulate. The longer this goes on, the greater volume of ice you will have building up and the greater volume of water you may have leaking down into the ceiling and wall when it finally warms up enough to melt.
If you're further baffled by frost forming on one side and not the others, you're probably looking at the north side. The sun will sometimes warm the south side enough to thaw and evaporate moisture but leave it still coated on the north side - again, not a problem unless the ice starts to build up.
Many homes in the northern parts of the US and Canada suffer from ice accumulation in attics, but homeowners often ignore it unless it causes a huge problem - mostly because they aren't aware it's happening until there's an issue - a lot like the ice monster that forms in the top of the freezer if the seal is defective - ice dams are caused by warm and relatively humid air leaking from inside a home into an insufficiently ventilated roof space, condensing, and forming ice.
What causes ice in attics?
Attic ice problems happen when there's a combination of 3 issues with a home's building envelope - and the thing that most often alerts home owners that a problem exists is a wet patch in the drywall on the edge of ceilings or the top of walls during the spring thaw.
Most homeowners assume they have a roof problem like a leak, that maybe their roof covering has been damaged over winter, but it probably isn't if the problem wasn't there before. Ironically, in our experience, ice often forms in the attic after DIY roof insulation projects where new insulation covers up ventilation access. If you discover you have ice in the attic, the 3 things to check first are:
- Humidity levels in the Home - do you have high humidity and condensation problems?
- Attic ventilation - Is your attic ventilated correctly and sufficiently?
- Air leakage from the ceiling - Is the ceiling vapor barrier intact and doing its job?
There are 3 different issues to check for and to deal with to fix the problem of ice buildup in an attic, and you really should work towards accomplishing all of them.
1. High humidity in homes
First of all, if the relative humidity of air in your home is too high, work to lower it. Anything over 50% RH is a bit much; 35-40% or so is good for humans and houses alike. The more humid the conditioned space of your home is, the more condensation you will probably have in the home, and also have in the attic.
You can reduce humidity by remembering to use bathroom and kitchen fans when showering and cooking, run a dehumidifier in the basement if needed, and don't hang laundry to dry indoors, unless of course your humidity is down around the 30% RH level then go for it.
It will save some dryer energy and a little more humidity will make for a more comfortable living space. If you have high humidity problems in the home, here's the guides on how to fix it and if condensation on the windows is a problem and needs fixing, here's the guide for that.
2. Attic ventilation:

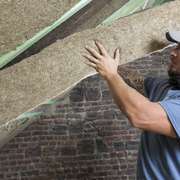
Next, roof ventilation - make sure your attic is properly ventilated. Check the attic to make sure that insulation isn't jammed down on the edges and blocking soffit vents. Proper ventilation - proper airflow - in a roof keeps it in good dry and sound condition, so make sure there are air baffles on the roof deck so that air can pass through from the soffit.
A simple way to check this is while wearing appropriate safety equipment for handling insulation products, carefully put head and shoulders into the unconditioned attic space with the lights off, shut eyes tight for 30 seconds, then look around the lowest edges of the roof. If there is light coming through from all around the edges of the roof, the ventilation is probably fine.
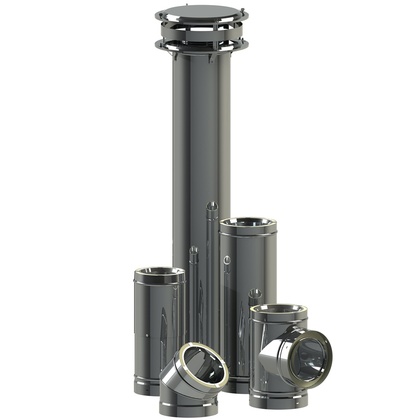
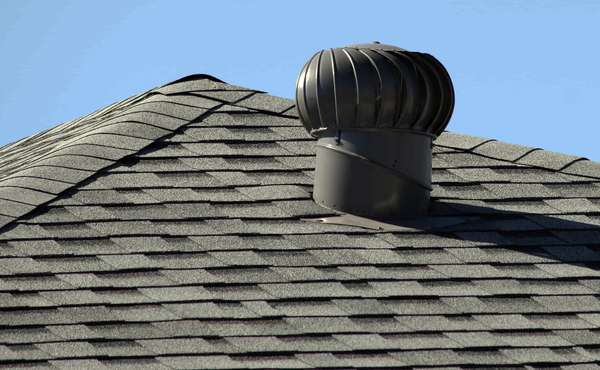
If not, chances are that when someone added insulation, they pushed it down all the edges and blocked air circulation - not good! There should also be a good vent at the top. And right at the top, either a ridge vent or another we like is the 'Maximum' vent (or any similar design); it has really good draw.
Vents on gable ends are not great as they leave the very peak neglected. If gable vents are what you currently have, you're better off sealing them and adding one at the top. Be sure to seal them; if you forget and leave them open, they will limit the effectiveness of the better ones you just installed.

Some builders have expressed concern that ridge vents aren't sufficient because they can be blocked by snow, but snow isn't an air barrier. It will slow the air, but as long as the vent runs the length of the roof there should be enough air flowing through.
You can apparently survive (for a time) after being buried in an avalanche if you don't panic and breathe slowly. Since roofs aren't prone to panic attacks, by that logic, they should be fine for a bit too for adequate ventilation if covered in snow.
3. Ceiling air barriers:
Lastly, but importantly, you should try to deal with any air leakage if you have ice forming in the attic. Electrical fixtures like diy recessed lighting or pot lights are notoriously leaky (and this may be better left to qualified electricians) but there are airtight boxes available that should be installed and that also hold insulation off areas that may get hot if still using incandescent bulbs.
The best solution all around is to replace old, leaky and incandescent light fittings with modern slimline LED fittings - carefully sealed against air leakage and saving energy too.
Another solution that isn't very complicated (or much fun for that matter) is dealing with these leaks from above. That would be you on your hands and knees in a dark attic crawling between trusses with a headlamp on, and if you've any sense all the safety gear like masks and goggles.
Stumbling around, likely letting out the occasional curse word as you bang your head, cut your scalp on the nails hanging through the sheathing, or jam your knee on a wooden block (or worse still a stray framing nail) while blind from the perspiration running into your eyes.
This step will require removing insulation too, so personally - having "been there, done that", I leave this job to insulation professionals - but if you're up in the attic at night with lights on below, anywhere that light comes through, air will be coming through as well.
Seal those holes any way you can - tape, caulking, spray foam, acoustic sealant, etc, but do bear in mind that you really must prevent excessive heat build-up in light fittings, junction boxes etc. Also worth noting, we wouldn't even suggest touching anything up there if in an older home that might still have knob-and-tube wiring - get this replaced first.
But, if you have no air barrier at all, you really do need one. This requires lifting insulation, laying down a polyethylene vapor barrier over the whole surface (it can go up and down over joists) then reinstalling the insulation.
Make sure the poly is well-taped at the seams and on the sides as well, it will serve little purpose if it allows air to flow up at the exterior edges. Pay close attention to not tear it while you're dragging it around, and tape it up if you do. Good luck with all this - we've seen enough old attics not to envy anyone the task.
Important to note as well, because it will likely come up if engaging contractors to help, that spray foam will also work to seal air leaks and add insulation. In the unfortunate situation of having no air barrier but a truss system that makes a poly air barrier impossible to install from above, spray foam may be the only solution.
We've generally steered our readers way from spray foam products in the past due in part to health concerns, but mostly to the very high greenhouse gas emissions from spray foam blowing agents.
However 2020 has seen great news about the reduced global warming impact of spray foam, as several manufacturers switch to less harmful blowing agents, read more here.
Now you know all about frost in attics: what causes attic ice and how to fix it, find more info pages about ice dams and ice damming as well as sustainable home improvement and resilient green building techniques here:
Sign up for a free Ecohome Network Membership and promote your business for free! |


As a practising roofer and consultant, I will note that ANY appearance of frost inside the attic, especially if it is vented, is a troubling sign. During winter, there are usually three sources of humidity in an attic: 1) a leak, 2) air infiltration from the living spaces, and 3) incorrect venting of kitchen, bathroom, washer, drier or plumbing vents. It is highly unusual for there being enough moisture in ambient winter air to form condensation (frost) on the underside of the roof deck in winter.
Moisture from leaks usually means that there is an ice-dam, with water entering the roof system under pressure. The short-term solution is to get rid of the ice-dam, and the proper solution is to ensure that the insulation and ventilation are sufficient to prevent the ice dam from forming in the first place.
Air infiltration from the living spaces is the more common cause of higher moisture levels in attic, and that needs to be solved by doing a good job sealing all the places where air can enter such as light fixture boxes, attic trap doors, etc.
Incorrectly vented outlet vents from appliances or rooms (kitchen, bathroom) or plumbing vents is unfortunately relatively common. The solution is usually to identify the source of the moisture, and connect an appropriate pipe to vent this outlet to the exterior. We see this when a renovation contractor "forgot" to connect the outlet to a vent on the roof.
If the air barrier is properly functioning, then the interior (living space) humidity should not have any appearance in the attic. Therefore, my suggestion is that IF one finds frost in the attic, one first has to identify which of the three causes is contributing to the problem. If it's due to air infiltration from the living space, then air-sealing should be the FIRST thing you do, not the last. However, our experience is that most of the time we can trace the frost to moisture entering the attic through a poorly installed vent that either leaks moist air, or just vents directly into the attic space.
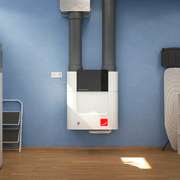
Hi. We have had this exact picture in our Attic/dead air space, and believe we have figured out the cause. However there was a day it got above freezing and that frost thawed. Do you think this little bit of frost on the underside would be cause for concern with it melting and running down the underside of the ceiling and down the wall... It only thawed and did this once so I'm hoping the insulation and anything else it got wet will dry and be ok...?
Hi Katie,
As Paul wrote above, any frost in there would concern me. If you have frost forming in your attic that means you have high humidity, and there must be a reason. Without details it's hard to say what the cause is, as well as what the solution is. You say you think you figured it out, what did you up with? It's not great for insulation to get wet so feel free to leave more details, I'd like to help you sort this out. Let me know what sort of insulation and how much, if there is a poly vapour barrier, vents on the roof or the gable ends, etc. And one thing to check immediately is if you have a bathroom fan that vents into the attic instead of outdoors. Regards, Mike
Ok so here goes. We have a rectangle house with attached garage. Vaulted ceiling throughout. The ridge vent runs the entire 94' of the house and garage. 34' X 34' Attic space above garage, uninsulated. And by Attic space I mean with Attic trusses and roof is 10/12 pitch so not just for crawling. Everything else is insulated including garage. Garage is heated with radiant heat in the floor and also has a drain. So we thought in the winter we could wash/hose off all the salt and dirt from our vehicles. Shortly after doing this when the weather got above freezing, it was "raining" a little bit in our house. After getting everything cleaned up and fans blowing to dry insulation, We bought a humidity tester. In our heated garage the humidity was about 70-75%. I believe all the steam and moisture from washing vehicles went up to the Attic space and froze to the underside of the wood throughout the house. We put a dehumidifier in the garage and it now runs about 45%. When we pull cold/damp vehicles in from outside it goes up to about 55% but then goes back down. (The humidity inside the house is about 25%-30%). We are still getting little frozen balls on the bottom side of the screws in the Attic area on the ceiling so it has been determined we need more ventilation. The metal roofing company said 94' of distance might be too long of a span for a ridge vent alone. We are going to start by putting a ventilation fan with louvres in the Gable end of the Attic. This fan will also have a humidistat on it to turn on when the humidity is high and then off when lower. If this doesn't completely fix the problem then we will think about installing another one on the other Gable end at the other end of the house, but that will prove much harder as that whole end is finished. Any suggestions would be great. We are trying to prevent adding anything to the roof because not only will it be hard to install, the more "things" on a roof the higher chance of leaking.
Thanks
Katie
Obviously this was from much earlier but looking at those photos your insulation level is very low. We can clearly see the top of the truss which likely means you have only R12 insulation. I'd blow cellulose on top which will help air seal the space. Heat will escape into your attic due to the poor insulation levels. When warm air cools it can no longer hold as much moisture and will release (condensate) on the coldest surface which is your roof deck especially down near the soffit edges. Long winded but basically I'm saying you need more insulation. There are lots of rebate programs that will help you do this at little to no cost.
Hi Katie, that’s different that I was expecting to hear, and I think you definitely found the source of moisture.
I’m confused about your attic - you say it is uninsulated but just after you say the insulation includes the garage, so in case it is not insulated, it really should be. That would also make me wonder if you have an air and vapour barrier in the ceiling. I say that because it seems like a pretty big oversight to heat a garage but not insulate it, and if that was missed then maybe there is no polyethylene barrier either, which would explain how you got enough moisture up there to ‘make it rain’. So make sure there is an air / vapour barrier (probably 6 mil poly) and that it is well-sealed.
Other suggestions would probably start with limiting the washing of vehicles, or at least keep the garage door open and blow a fan out when you do. And squeegee the floor afterwards as well, the less residual moisture on the floor the less will evaporate into the air. Parking cars in a garage will for sure add moisture in winter as snow melts, but it is mostly the washing, and particularly if you are doing it with hot water and a pressure washer, that is increasing the moisture in the air. When that is going on it may even be 100% RH.
As you would have read in the article, we have seen great results with Maximum attic vents. I understand your hesitation at creating more holes in your attic, but with a metal roof you should be able to do a good job because the metal can be entirely removed and replaced afterwards to make sure it is done right.
I like the ridge (and Maximums) better than the gable ends because of the natural stack effect of warm air rising. A vent on the gable ends may still allow moist air to collect at the very peak, so if you go that route I would make sure it is as high up as you can put it.
The last of my forensic suggestions would be to lift a section of the ridge vent to make sure there are sufficient openings underneath it. I once saw a crew install sheathing on either pitch that were tightly butted up to each other, They then put a ridge vent on top as if air will magically appear from nowhere, and I’m sure that’s not the only time someone did that. Given that I can’t be sure if you have insulation up there you may have additional questions, but whatever you decide on please drop a us a line and let us know how it worked out. Regards, Mike
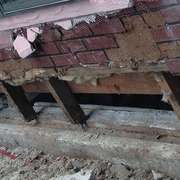
This is me standing in the middle of my Attic. On the other side of this wall is our loft. It is above approximately half of our house. This picture shows how are attic kind of flows into the dead air space above the house part. This attic is directly above the garage and the attic itself is not insulated but the walls and ceiling of the garage is insulated underneath. what I am standing on is the sub floor over insulation and then the metal. On the exterior roof there is would then a vapor barrier than the metal roof. So I'm not exactly sure where you think I should have and another vapor barrier.
I recently purchased my first 771 sq ft home, that was built in 1993. With our first warm temperatures…we have water leaking through our ceiling.
The shingles on the roof were replaced in 2013. So I am guessing this might be a condensation problem?
I found out I do not have a true cathedral ceiling above my living room space. It has a 3 to 4ft clearance at the peak in the attic. There are 6 led lights on the T&G ceiling, followed by drywall, then painted and topped with vapour barrier and R30 fibreglass insulation. Also there are 6 small vents in the roof.
I had 2 people come out to look at the attic space. One roofer told me it is condensation coming through the cut barrier around the led lights. He quoted me around $588 to seal 6 pot lights. The other person went through the entire attic space and found the bathroom fan/vent is not leading to the outside. The deck is completely wet around this area. He thinks this might be one of the main reasons why there is so much frost at the ends of the attic. He also thinks I need a whirlybird air vent to get some the moisture out.
For now I have lots of frost that will begin to melt and find its way into my living space. Not sure what the source of this problem is and how I can prevent it from raining in my home until I find out. I am very confused as to who I need to go with? Maybe I need to call another person for the tie breaker? Sorry for the long message. I will try to send pics as soon as figure it out. Lol Thank you so much for all of your help.
Help me understand Katie, you say that the roof of the house has metal roof over a OSB (wood sheathing ) separated by a vapor barrier? I hope by vapor barrier you do mean tar paper? If it is 8 mil poly ( vapor barrier ) that is your problem. Vapor barrier should only be installed on the warm side of the insulation.
I'm not proposing another vapor barrier, my first thought was that if someone omitted insulating over a heated space then they could easily have omitted a vapor barrier too. I still don't have a really good understanding of how it is constructed I hesitate to ask for more details and put your to work for no reason, as I think you really nailed it by identifying the source of the moisture and you may have solved the problem. To sum it all up, your attic should have an air barrier to protect leakage, a vapor barrier to stop moisture diffusion, and insulation on top of that, and a well ventilated space.
Hi Par,
Yours is intended to be a vented attic (though it doesn't seem to be vented at all), so shingles aren't the problem. If your bathroom fan vents into the attic that is definitely a problem, it has to be vented outside, get that done right away. Right now you are blowing warm humid air into a cold space, so it is condensing on the cold roof sheathing.
Air leaking around pot lights can cause a problem but that would be a drop in the bucket compared to the other issues you have.
What looks to be the big problem from looking at your photos, is it doesn't look like you have any ventilation baffles. I am surprised that you had an experienced builder inspect it and they didn't mention that, so it is possible I am missing something, but it really looks to me like that's the big problem.
If you look at the last photo in the article, you see the thin grey foam baffle stapled to the roof sheathing - that lets fresh, dry air come in through the soffit, you don't seem to have any. And the photo above that one is a Maximum vent, they are like the whirlybird vents you were proposed, only these work better.
With no baffles, no roof vent, and exhausting your bathroom fan into the attic, the pot lights are the last thing you should be worrying about. Do them for sure but get all the other stuff done first - vent the bathroom fan out, pull back the insulation at the edges and install baffles (make sure there is exterior venting in the soffit of course) and then think about the pot lights.
The insulation may have become moldy and quite ineffective, you may also have to remove it. If so, I would propose you blow in cellulose insulation, but even before that, make sure there is a vapour barrier, though I believe there would be because that is probably what the one contractor told you was leaking around the pot lights.
Please confirm with your contractors that they inspected it first for ventilation as I mention, and please also get back to me with what they say. This is a fixable problem but you need to have someone who knows what the real problem is if they plan to fix it.
I can tell by the 'U' in vapour that you are in Canada, and so R30 isn't very much. Where are you located? That would help us collectively decide how much insulation you should have up there.
I am having a similar problem with frost in my attic. My home is only 5 years old and is covered under the Home warranty still, so my builder continues to come back and attempt to solve the issue (which I am thankful for). We have had frost in our attic for the last three winters with it not being fixed (but attempted). However, we are in the middle of the longest cold snap in ten years and I have noticed that the issue is much better than previous winters and more isolated next to specific features (such as the range hood vent, bathroom vents, and gas fireplace. I have the building contractor coming again today to attempt to determine where the leaks are. I have R50 blow-in in the attic and found that surrounding the bathroom vents the insulation is moist and a super thin layer of frost has formed on the top, likely directly above the air leaks. All baffles are clear of ice damming and any frost located near these is tremendously isolated and typically does not cover 100cm2 or 15 square inches for those of you south of the border. My home was constructed with a paint on vapour system, which I felt may be the issue, but it passes all home inspection. Now with the more isolated frost, I feel like it is likely just leaky fixtures in the attic space and should be resealed all fixures have poly boots, and i noticed that the one covering the bathroom fan has a slit in it and may be one of the culprits. Does anyone feel comfortable with my conclusions? If anyone has anything to add, I would really appreciate the feedback!
Hey Mister T, my name is Jesse. I am having a very similar problem with my attic space. I live in norther Alberta and have also had a very cold February. Today it got up to -1 and I heard a couple drops of water on my attic hatch. Upon going up to have a look I noticed the Northside of my roof was frosty and was starting to melt in spots causing the insulation to become a little damp in some areas. I have 5 roof vents and plenty of blown in insulation so I’m not sure where the issue is. If you do find out anything with yours could you email me what they found to be the issue please. [email protected]
im just not sure what it could be. We do have many pot lights and I though it could be possible that humidity from the house could be escaping into the attic from them. I may also have to check my fan ducting again from my bathrooms and range hood.
Thanks
Hi Jessie,
You for sure have humidity building up in the attic so a few things for you to check -
First make sure the insulation isn't jammed into the far edges blocking the soffit, that's probably the most common problem. Even though you have vents where moisture could escape, it can't go anywhere if you block the point of entry.
Also check to make sure dryer vents and range hoods vent outside, not into the attic space.
Air could be leaking into the attic space from the pot lights so it is best if they are sealed for air leakage but given that you say you have 'plenty of blown in insulation' I suspect your biggest problem at this point is that you don't have a sufficient supply of outdoor air.
Thanks for the awesome articles! I really appreciate your advice and feedback. I was curious what you think of the following situation. We have a 1930's house, which we are presently doing renovations on. We used a lot of your tips with regards to passive solar to build the addition. When redoing the roof they discovered one area without insulation. I checked in the old house and found insulation (and can't find the spot they found none). BUT I found no vapour barrier... only insulation and black paper (which I assume is air barrier). What would be the best way to create a vapour barrier do you think.
Would it be possible to simply add a vapour barrier over the gyprock and then add something ontop of that? I would rather not rip out all the gyprock if I can and the roof is tragically finished so no going that route.
Actually we spoke with a carpenter and they indicated that would be a bad move. Oh boy that m eans we gotta remove all the gyp
Or do you feel that adding the poly won't make a difference?
The article was very informative. I have a similar problem that I can't solve. We moved into a house in summer 2017 (the house was built around 2003). In the summer of 2018, we added insulation to our attic as there was an updated building code and the government was subsidizing the cost.
After the winter of 2018/2019, in the spring time when the snow thawed, we noticed water leaking from our attic hatch. We went and so tons of ice and frost and had to remove it. Over the summer, we checked the attic and found that one of our bathroom exhaust pipes was damaged so we replaced. I was reading online that more ventilation can help and every house in our neighbourhood had a Maxi Vent. So we installed a maxi vent. We also have 2 box vents that were there before we moved in. After that I regularly checked the attic. When temperatures fell in the Fall, I saw condensation. It was not the whole attic but just around the Maxi vent.
I called a couple of roofers and most said that the soffits are blocked and you need to insert baffles. One said that there is a mix of ventilation between the Maxi vent and the box vents and suggested removing it. However, other roofers said that the Maxi vent is good. So we decided to put the baffles in and added more insulation (as that is what most suggested).
However, looking back at the attic, there is still condensation there and since temperatures are below freezing, the condensation has turned into frost. I don't know what the problem might be. Now I'm thinking that the Mixed ventilation might be the problem as I'm reading about vents causing the air to short-circuit. Do you think it would be a safe bet to remove the Maxi vent? Also the closest box vent is just over 15 feet away from the Maxi vent, if that makes a difference in the short-circuit theory.
Thank you!
Blocked soffits are a very common cause of attic condensation, so that was a good call on the part of the roofers when they recommended baffles. How high up on the roof are the box vents? Are they perhaps too low and therefore short circuiting the Maxi vent as you suggest? And are the Maxi Vents high enough? They should be right up by the peak of the roof.
Also, that you found the frost around the Maxi vent is interesting. That may indicate that they are working, but at the same time that there may be a really high level of moisture, are you sure that all bath vents and your stove hood are vented out completely?
To continue your forensics, I’d start with maybe getting a hydrometer to measure the moisture in the house and also pop it in the attic for a turn as well. They’re cheap and easily found at hardware and building box stores.
And the reason I suggest checking the moisture in the house is that it is possible that you don’t have a proper air barrier, so if you also don’t have an HRV (do you?) and you don’t use bath fans and a stove hood then you could have some really moisture-rich air in the house that is then leaking into the attic.
I’d also be more inclined to leave the Maxi vents rather than the box vents. I would suggest blocking the box vents from inside the attic for a period of time (just tape a sheet of plastic over them) and see if that makes a difference. If not, then you could try the same experiment with leaving the box vents open and blocking the Maxi vents. but the Maxis’ really do perform better, as long as they are installed in the proper location.
I know I've given you more questions here than answers, sorry! It just takes more info to solve this stuff. And another question, where are you located? (closest city or climate zone - knowing the average temperatures and humidity is good for mystery solving)
Thanks Mike for replying!
When we put the baffles, we topped up the insulation to R-60. Our climate Zone is 6
I have made sure that all bath and stove vents are going out. We always use the kitchen exhaust fan and the bathroom fan when cooking and leave it on for 10-15 min after.
I got a hydrometer and the humidity inside the house is 35%. Seeing the moisutre, a lot of the roofers said to turn off the humdifier and keep the humidity low.
The Maxi vent is slightly higher than box vents but it is not at the highest point. What I noticed was there was frost on the ceiling of the attic going up towards the maxi vent, but from the maxi vent and onwards, the ceiling was wet (no frost up there, but just conensation). Why do you think that might happen? Where the very top part of the ceiling is wet and there is frost on the other lower side of the ceiling after the vent?
I live in Alaska and for the past 65+ days the temperatures outside has stayed between -10 and 25 degrees. It has started to warm up, finally, and we had water dripping thru a wired smoke alarm. Upon investigating we discovered an area of frost in our attic. We have a HRV system that runs and the humidity in the house is about 33%. We keep our vehicles parked in the garage and the temperature about 55degrees. We did have ice and condensation on the garage windows and snow melting from the vehicles. I am suspecting this is the source of the frost in the attic as the attic hatch is also in the garage and is not sealed shut. If I ran a dehumidifier in the garage could this stop the frost from forming in the attic? The garage ceiling is insultated as are the walls.